

Table of Contents
Overview
The Portal allows us to publish, document and support our APIs. It also allows you to locate, use, test and get help for your APIs. This guide provides step-by-step instructions on how to use the Portal. This overview includes things like navigating the portal and a description of the purpose of each screen within the Portal.
Product Owner Role
The Product Owner is a central figure in the API Portal, responsible for overseeing the management of Developers and Customer Support team members. They have the authority to manage developers, update API information, and handle various documents.
Contacting Client Support
Client Support is available by phone toll-free at (800) 937-3661, Monday through Friday, from 5:00 a.m. to 5:00 p.m. Pacific Time (excluding holidays), or you can reach Client Support by email at support@chromedata.com.
Registering for the JDP API Portal
-
- To setup your account, you will be assigned to your company account. You will then receive an email from support@api.jdpower.com with the subject line: API Portal Account: Setup Required.

- Upon receiving that email, click the Complete Setup link. This will direct you to a Set Password page. Enter your new password and enter again to confirm then select Set Password button.

- You will be directed to the Customer API Portal login page https://portal.jdpower.com/jdp-dev-login/ where you can then enter your account credentials; Username is your email address and Password is the one you’ve just set, then click the Login button.
- To setup your account, you will be assigned to your company account. You will then receive an email from support@api.jdpower.com with the subject line: API Portal Account: Setup Required.
- This will take you to the Customer API Portal homepage https://portal.jdpower.com/
Accessing the Portal

About the Portal
The following list provides a description of the areas you can access in the Portal.
- APIs: Upon logging into the portal, your default landing page will show a list of your assigned APIs. It can also be accessed by clicking APIs link at top of page. On this page, you can scroll through the list of existing APIs or find an API by entering its name into the search field – search results are dynamic, so the list updates as you type. See The APIs Page for more information.

- Dashboard (WP Admin): Available from the top lefthand side of the page, hover over Customer API Portal and select Dashboard. This is where you can manage documents and information about the Portal and APIs. See Dashboard for more information.

- New: Located on the left of the top ribbon, hover your mouse over New to expand a menu of options, where you can quickly create and publish the following:
- Post
- Technical Doc
- What’s New
- Marketing Info
- User

- User menu: By clicking your username in the upper right, you can update your profile information. Hover over your name to expand a menu, which contains an additional option to log out.
Note: The Customer API Portal link in the left top ribbon changes its destination depending on the page you’re on – if you’re in your dashboard, the link takes you to the APIs page; if you’re on the APIs page, the link takes you to your dashboard.
Dashboard
The dashboard is where you can view, manage, and create posts, API descriptions, and comments.
As a Product Owner, you are responsible for managing and creating content that appears on the following Portal pages:
- API Descriptions
- Technical Docs
- What’s New
- Marketing Info
Additionally, you can add users and update your profile.
This section describes the tasks you can perform from the dashboard in more detail.

Adding and Managing Content
From the dashboard, you can view, create, and manage content related to a specific API.
You can create content to promote the API and highlight the changes of a new API version directly in the dashboard.
API Descriptions
Write a brief summary that helps customers determine which API they want to open. Use it as a sales tool to quickly communicate what the product is.

Technical Docs
Add and identify the documents that provide the information a developer uses to access the API service.
Note: The OAS and WSDL content is managed manually by members of the Tyk team.
What’s New
Explain what’s changed to an existing customer. This content is optional and will not display if you have not added content here.
Marketing Info
Add content that provides an overview of the web service. It should include a description of what an API does. It is the default page that opens when a user selects an API to view.
When the content or document applies to multiple APIs or versions of an API, you can select all of them in the API Versions section of the page.
To add a new document or page content:
- Open your dashboard.*
- From the left tab menu, select the type of document/content you want to add Technical Docs, What’s New, or Marketing Info. Note: This determines where in the Portal it will be published and accessed by users of the associated API(s).
- Click Add New.
- Fill in the necessary fields with the content.
- Select the API Version(s) the content is to be associated with. Tip: To select multiple API Versions (but not All), hold CTRL while clicking the desired API Versions.
- Click Publish. Alternatively, you can click Save Draft if you aren’t ready to publish yet.
Note: Instead of opening your dashboard, you can also hover your mouse over +New on the top ribbon while on the APIs page and select the content type you want to create.

To update/edit or add a document or page content to existing content:
-
-
- Open your dashboard.
- From the left tab menu, select the content type you want to update/edit –Technical Docs, What’s New, or Marketing Info.
- Hover the mouse over the article you want to update/edit to reveal editing options such as Edit (in both block and classic editor), Quick Edit, Track and View. Editing in block editor is preferred.
- Quick Edit allows you to update the title, status, template, publish date, password protection and slug. Make the necessary changes and click Update.

- Quick Edit allows you to update the title, status, template, publish date, password protection and slug. Make the necessary changes and click Update.
- Click Edit (block editor)
- To replace a current document, delete current document, select the elipses above the doc and select delete.

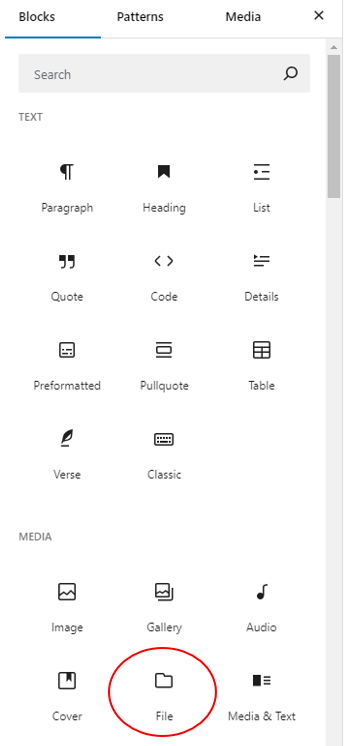
- Then select the [+] in upper left (toggle block inserter} – scroll down and select File within Media. Choose file to insert in its place.

- To add a document to a current document, scroll beneath the document and click white space until you see Type/ to choose a block. Click within that area to display (+) at the right.

- This will bring up the insert block mini menu, select Browse all to see full menu. Scroll down and select File within Media.


- Upload the file to insert beneath existing file.

- Once complete, select Save.
- To replace a current document, delete current document, select the elipses above the doc and select delete.
- NOTE: For API Descriptions, only the description can be edited. You may do so by clicking in the description field and modifying the text there. Any new API descriptions need to be added by the Tyk team.
-
To delete content:
- Open your dashboard.
- From the left tab menu, select the content type you want to delete –Technical Docs, What’s New, or Marketing Info.
- Hover the mouse over the article you want to delete to reveal editing options.
- Select Trash. The content is deleted.
Adding and Managing Users
You can add and/or manage users from your dashboard.
To add a new user:
- Open your dashboard.
- From the left tab menu, click Users.
- Click Add New User.
- Complete the required fields and then click Add New User.
New users receive a welcome email with a link to set up their password.
To manage a user account:
- Open your dashboard.
- From the left tab menu, click Users.
- Within All Users, find the user(s) you want to edit and hover your mouse over their username to reveal options. You can:
- Edit their information
- Delete their account
- View their account
- Send a password reset
Note: You can also delete users from this section by selecting Trash in the editing options.
The APIs Page and Its Functionalities
When you click the APIs link within the top section of the Customer API Portal, a page listing available APIs opens. The API Description you created in the Dashboard displays in the list to help identify the API’s purpose.
Clicking an API’s corresponding eye icon under the Details column opens a page that may include the following:
Click the links in the list above to learn more about each one
Search
Marketing Info

Technical Docs
- Open the APIs page.
- Click the API you want to find documentation for.
- Click Technical Docs. A list of existing documentation for the most recent API version displays.
- If necessary, in the Select API Version menu, choose the API version you want to view.
- Click the document. A page opens with the document embedded.
- To download the document, click Download.
Note: Current and previous versions of the OAS (Open API Spec) and if available WSDL are available for download by clicking on their icons to the right of the Technical Docs sub-header.


For details on adding and updating the technical docs for an API, refer to Adding and Managing Content.
What’s New
This is where you can view the news (when available) about a selected API, such as release notes, that you created in the Dashboard.
- Open the APIs page.
- Click the API you want to find documentation for.
- Click What’s New. A list of existing documentation for this API displays.
- If necessary, in the Select API Version menu, choose the API version you want to view.
- The content displays on the page.
Test Client

The API’s Test Client page, with company and key selected. The .json link beneath the API name includes Open API details (formerly referred to as Swagger) defaulted to current version. The text beneath the link summarizes the types of operations available. These operations are displayed below on the page as expandable menus.
- Open the Portal. The APIs page opens.
- Find the API you want and click the eye icon associated with it (under the Details column).
- In the left navigation menu, click Test Client.
- On the Test Client page, select the API Version, Company Name and API Key.
- Click the dropdown to expand the options for the type of API operation you want to perform.
- Click Try it out. The text fields are now editable.
- Enter the relevant information into the text fields.
- Click Execute.
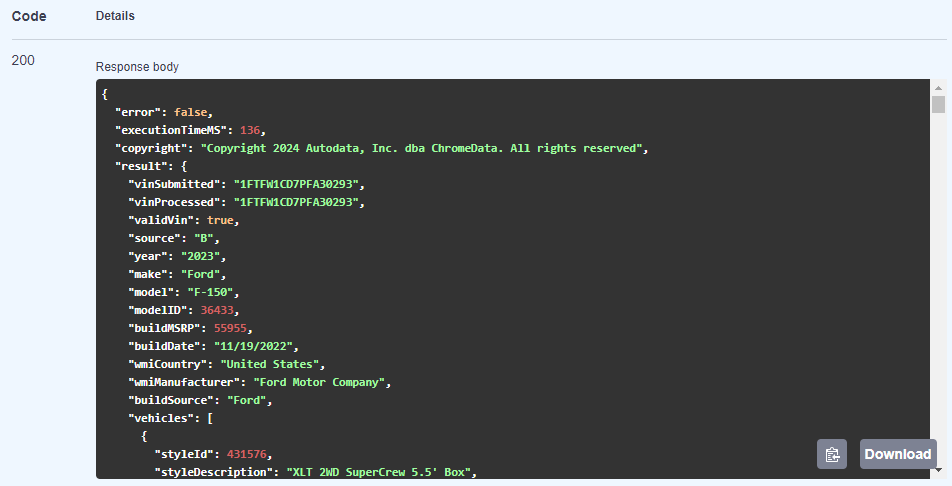
The request is sent, and response details are returned below on the page. The sample below shows the GET operation expanded.

Downloading the Response
After you execute a request, you can download the response in json format.
To download the response:
- After executing a request, scroll down the Responses and find the server response code you want to download.
- Click Download hovering in lower right of the Response body.
- When the download finishes, open it from your browser or the Downloads folder in File Explorer to view it in Notepad.
Access
This page contains a list of customers who have access to the API (under the Alias column) as well as the API keys and secrets for each. You can also view the API version, and the customer’s limit, quota and expiration date on this page. Use the information on this page to support a customer who might have lost their key or secret.

- Find the key/secret you want to copy. Tip: Use the filters to help narrow the listings.
- Click the Copy icon beside the key/secret name. The key/secret is in your clipboard.

Analytics
- Company Name
- API Key
- Version
- Timestamp
- Status Code
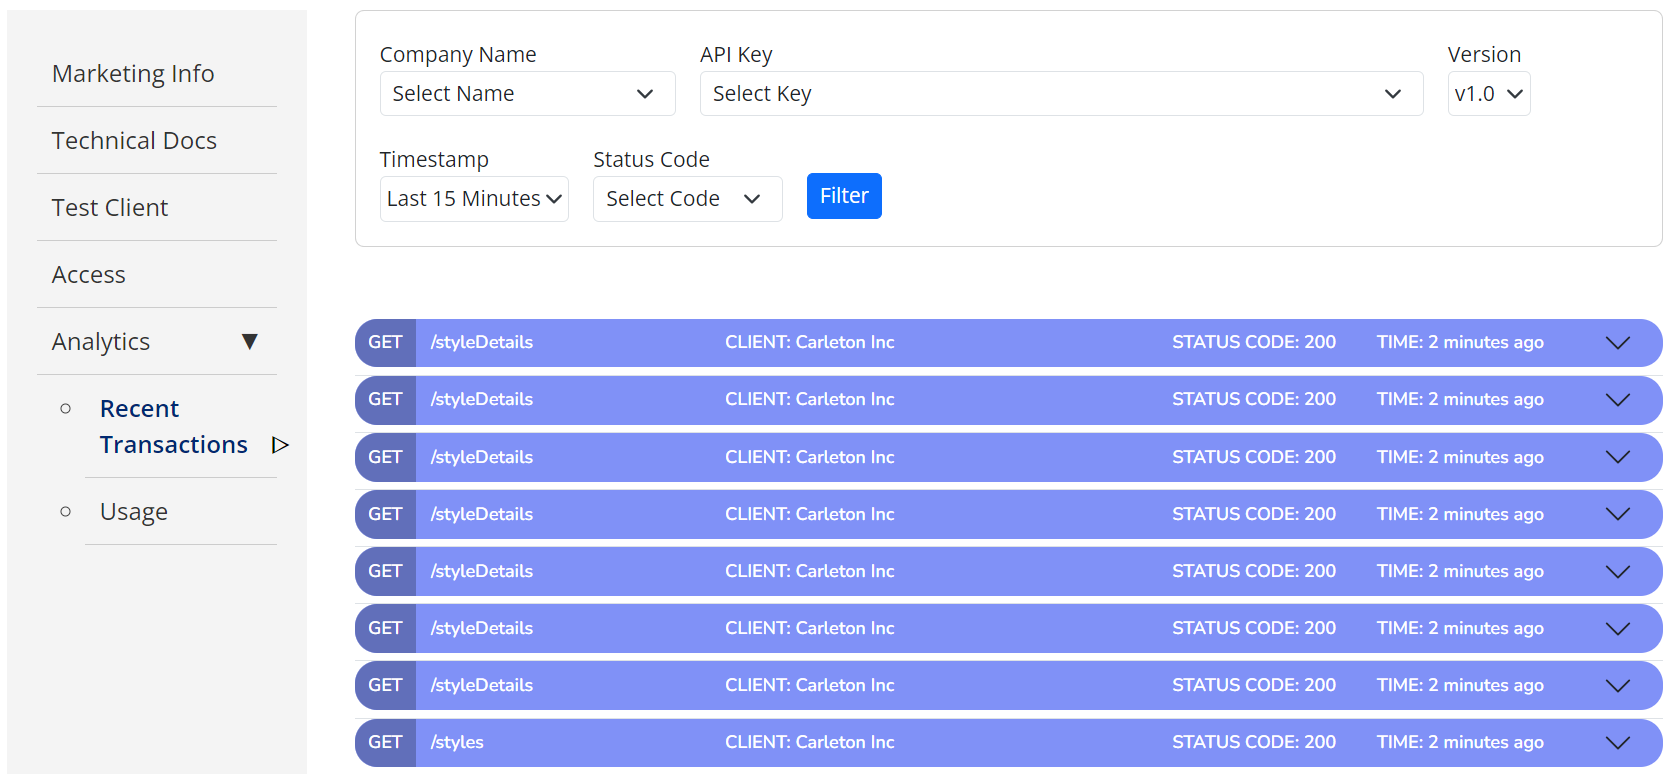
Search results are color-coded for each operation (i.e. “GET”, “PUT”, etc.). You can click a result to expand it and view metadata details about it. Use this information to help a customer troubleshoot an API call.


Roles
Different roles within the Portal have specific functionalities and access levels. Below are the main roles and their associated capabilities.
Customer Support
Customer Support members are responsible for assisting users with issues and inquiries related to the Portal. They have limited access compared to Product Owners and Developers.
Limited Access
Customer Support members can view API details and documentation but do not have permission to add, edit, or delete users/documents.
Assist Users
Provide help and support to users with issues related to API access, documentation, and other Portal functions.
Developer
Developers are users who have read-only access to API details, documents, and analytics. They get timely email alerts for their contract APIs.
API Access
Developers can access API details, upload and organize technical documents, and review analytics.
Add Team Members
Developers can expand their teams by adding new members, using first name, last name and email address; the new team member receives a welcome email with a link to set a password.
View/Edit/Delete Team Members
Developers can view a list of all team members for effective collaboration, can edit and delete all other team member accounts except primary developers.
Restrictions
Developers cannot delete the primary developer who created their accounts, ensuring the stability of the team structure.
Developers cannot delete their own accounts to prevent accidental loss of access and permissions.
Login and Dashboard Access
After logging in, Developers land on the APIs page, where they see a list of their contracted APIs with short descriptions. This list includes a quick filter to easily find/manage specific APIs.